🎉 Up to 70% Off Selected ItemsShop Sale

Urban Nature Store Fly-through Feeder Kit
Proudly Handmade in Canada
- Make your own Fly-through feeder kit
- Ideal for kids project
- It can be assembled and hung with a chain.
- Detailed instructions included with the pictures.
- Product Dimension: 11.5"x 6.5"x10.5"
Instructions:
Step 1: Nail the side wall of the feeder platform to the top side of the platform using 2 nails. Make sure both the ends and side are flush. The side pieces are not square and should be positioned so the nails go through the narrow edge giving the feeder tray more depth. Repeat on the other side using the other side piece.
Step 2: Nail the sides of the feeder to the end of the tray using 2 nails. Make sure the bottom edges are flush and the sides are centered on the end of the tray. Repeat on the other side.
Step 3: Nail the roof pieces together using 2 nails. The nails should go through the wider board and into the edge of the narrower board so that they make a 90-degree angle and both sides of the roof are the same width. The top edge and ends should be flush.
Step 4: Place the roof on the top of the feeder and fasten using 1 nail on each side. Repeat at the other end.
Step 5: Screw the hooks into each end of the roof just under the peak leaving the open side facing down. Make sure they are centered under the peak so the feeder hangs straight.
Step 6: Loop the ends of the chain into each hook.
Product Information
Product Information
Shipping & Returns
Shipping & Returns
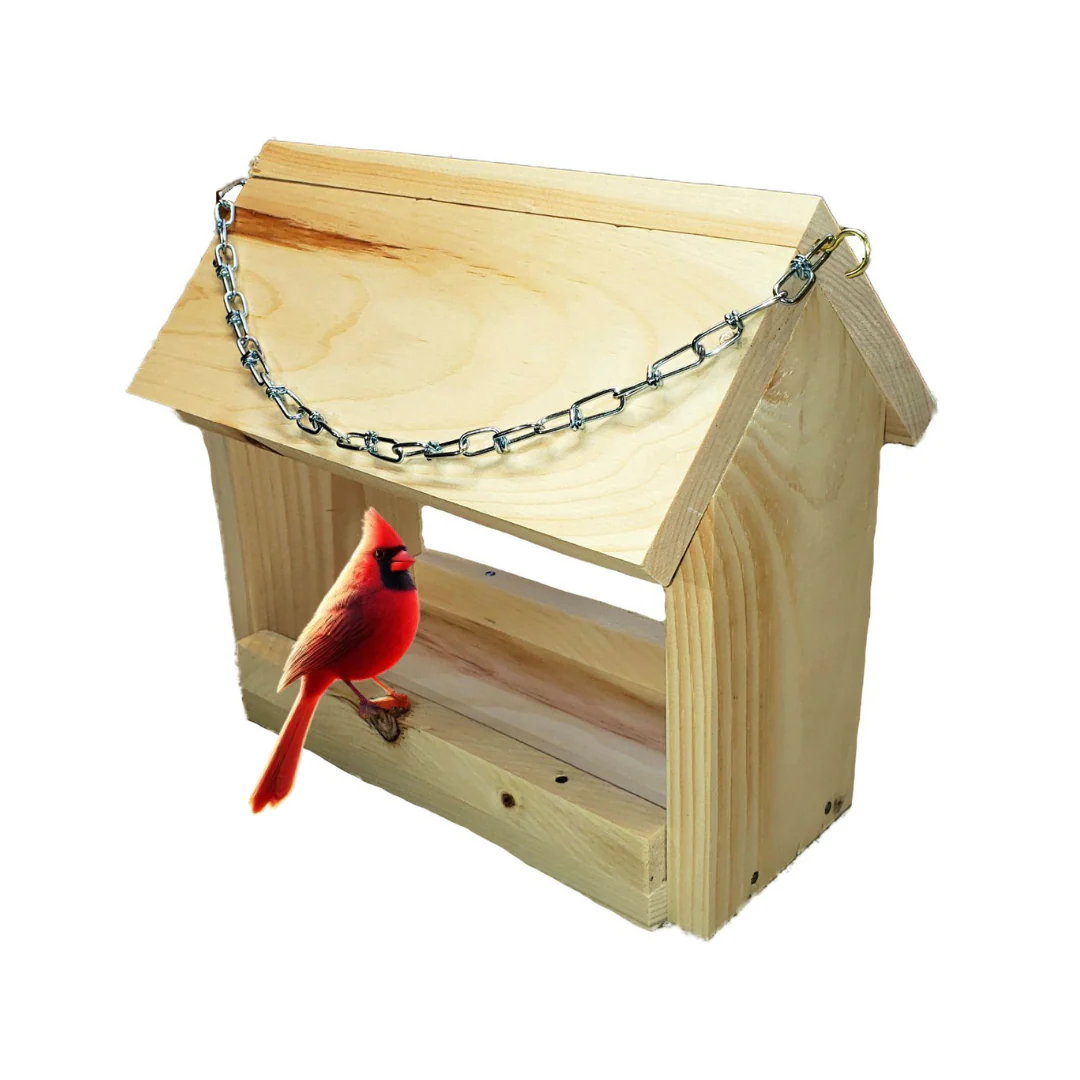
Urban Nature Store Fly-through Feeder Kit
Urban Nature Store Fly-through Feeder Kit
Proudly Handmade in Canada
- Make your own Fly-through feeder kit
- Ideal for kids project
- It can be assembled and hung with a chain.
- Detailed instructions included with the pictures.
- Product Dimension: 11.5"x 6.5"x10.5"
Instructions:
Step 1: Nail the side wall of the feeder platform to the top side of the platform using 2 nails. Make sure both the ends and side are flush. The side pieces are not square and should be positioned so the nails go through the narrow edge giving the feeder tray more depth. Repeat on the other side using the other side piece.
Step 2: Nail the sides of the feeder to the end of the tray using 2 nails. Make sure the bottom edges are flush and the sides are centered on the end of the tray. Repeat on the other side.
Step 3: Nail the roof pieces together using 2 nails. The nails should go through the wider board and into the edge of the narrower board so that they make a 90-degree angle and both sides of the roof are the same width. The top edge and ends should be flush.
Step 4: Place the roof on the top of the feeder and fasten using 1 nail on each side. Repeat at the other end.
Step 5: Screw the hooks into each end of the roof just under the peak leaving the open side facing down. Make sure they are centered under the peak so the feeder hangs straight.
Step 6: Loop the ends of the chain into each hook.
$6.48
Original: $21.59
-70%Urban Nature Store Fly-through Feeder Kit—
$21.59
$6.48Product Information
Product Information
Shipping & Returns
Shipping & Returns
Description
Proudly Handmade in Canada
- Make your own Fly-through feeder kit
- Ideal for kids project
- It can be assembled and hung with a chain.
- Detailed instructions included with the pictures.
- Product Dimension: 11.5"x 6.5"x10.5"
Instructions:
Step 1: Nail the side wall of the feeder platform to the top side of the platform using 2 nails. Make sure both the ends and side are flush. The side pieces are not square and should be positioned so the nails go through the narrow edge giving the feeder tray more depth. Repeat on the other side using the other side piece.
Step 2: Nail the sides of the feeder to the end of the tray using 2 nails. Make sure the bottom edges are flush and the sides are centered on the end of the tray. Repeat on the other side.
Step 3: Nail the roof pieces together using 2 nails. The nails should go through the wider board and into the edge of the narrower board so that they make a 90-degree angle and both sides of the roof are the same width. The top edge and ends should be flush.
Step 4: Place the roof on the top of the feeder and fasten using 1 nail on each side. Repeat at the other end.
Step 5: Screw the hooks into each end of the roof just under the peak leaving the open side facing down. Make sure they are centered under the peak so the feeder hangs straight.
Step 6: Loop the ends of the chain into each hook.